一、Vue CLI
安装脚手架遇到问题可以尝试清空这个文件夹
1 | C:\Users\yzhou\AppData\Roaming\npm-cache |
parse解析
1.1. runtime+compiler和runtime-only的区别
- **runtime+compile:**template -> ast -> render -> virtual dom -> 真实DOM
- runtime-only: virtual dom -> 真实DOM
- 性能更高
- 代码量更少
- 箭头函数render: (h) => h, ->本质上是creatElement
- ESlint
render -> vdom -> UI
1.2. 认识Vue CLI3
vue2.5.21 -> vue2.x -> flow-type(facebook)
vue3.x -> TypeScript(microsoft)
- webpack4 (v2webpack3)
- 设计原则0配置
- vue ui 可视化配置,更加人性化
- 移除static,新增public,将index.html移动到public中
preset配置
feature特性
rc->run command
vcs->version control system(版本控制git/svn)
- 如何通过CLI3创建项目
- CLI3的目录结构
- vue配置文件的查看和修改
- vue ui
- 去找隐藏的配置文件
- 自定义vue.config.js
二、Vue-Router
2.1 认识路由
- 后端渲染\后端渲染
- 前后端分离
- SPA\前端路由
路由(routing):通过互联的网络把信息从源地址传输到目的地址的活动
映射关系:ip地址:mac地址
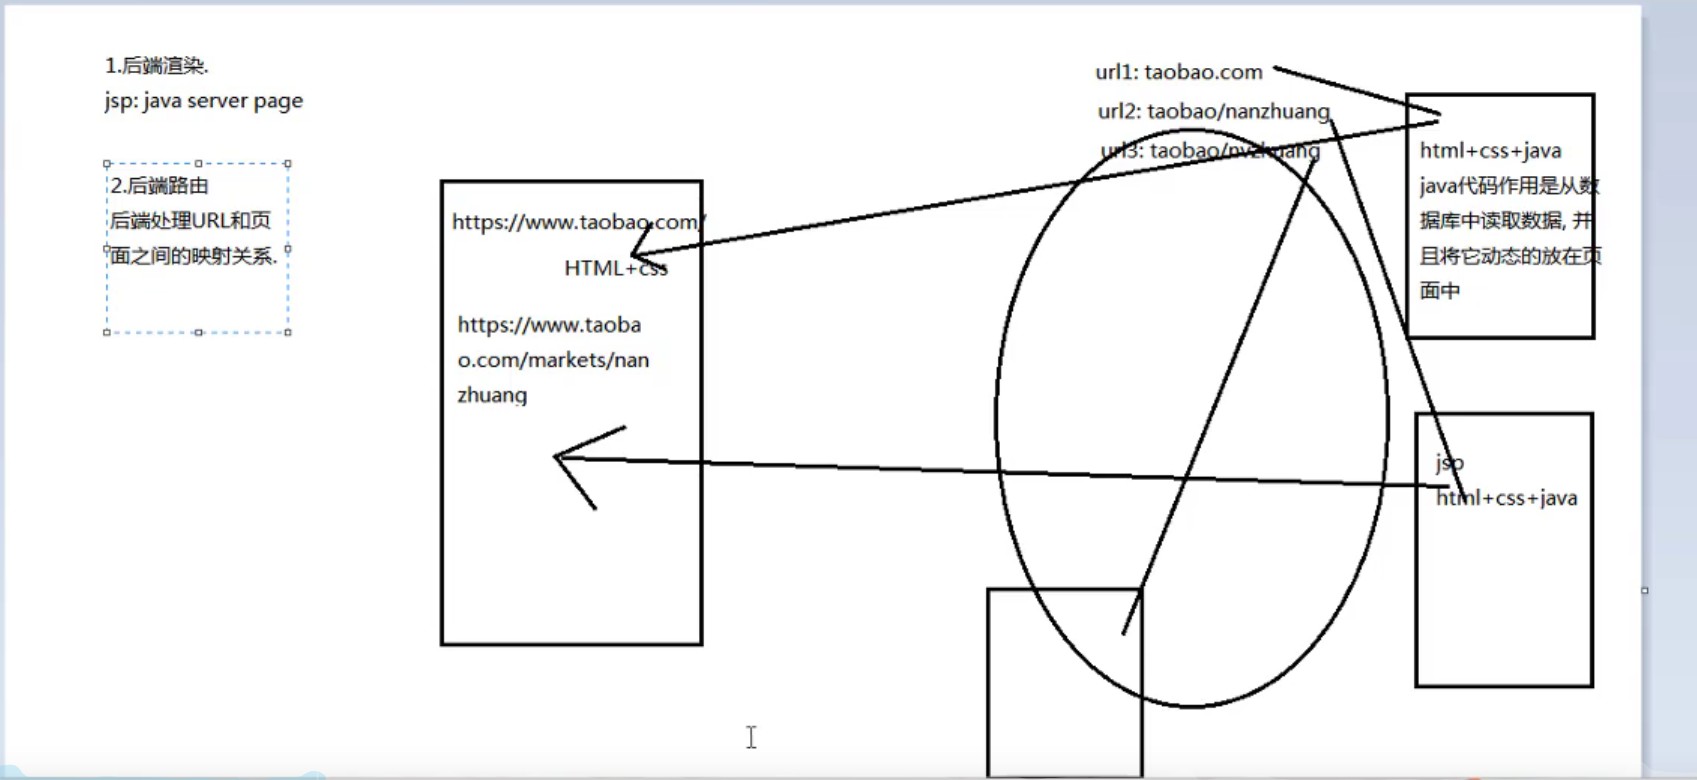
2.1.1 前端渲染和后端渲染:
历史阶段:
- 后端渲染阶段
后端路由阶段
■早期的网站开发整个HTML页面是由服务器来渲染的
口服务器直接生产渲染好对应的HTML页面,返回给客户端进行展示
■但是,一个网站,这么多页面服务器如何处理呢?
口一个页面有自己对应的网址,也就是URL
口URL会发送到服务器,服务器会通过正则对该URL进行匹配并且最后交给一个 Controller进行处理
口 Controller进行各种处理,最终生成HTML或者数据,返回给前端
口这就完成了一个1O操作
■上面的这种操作就是后端路由.
口当我们页面中需要请求不同的路径内容时,交给服务器来进行处理,服务器渲染好整个页面,并且将页面返回给客户顿
口这种情况下渲染好的页面,不需要单独加载任何的s和cs,可以直接交给浏览器展示,这样也有利于SEO的优化
后端路由的缺点
口一种情况是整个页面的模块由后端人员来编写和维护的
口另一种情况是前端开发人员如果要开发页面,需要通过PHP和Java等语言来编写页面代码.
口而且通常情况下HTML代码和数据以及对应的逻辑会混在一起,编写和维护都是非常糟糕的事情.
- 前后端分离阶段
口随着Ajax的出现有了前后端分离的开发模式
口后端只提供AP来返回数据,前端通过Ajax获取数据并且可以通过 JavaScript将数据渲染到页面中
口这样做最大的优点就是前后端责任的清晰,后端专注于数据上前端专注于交互和可视化上.
口并且当移动端(ioS/ Android)出现后,后端不需要进行任何处理依然使用之前的一套API即可.
口目前很多的网站依然采用这种模式开发
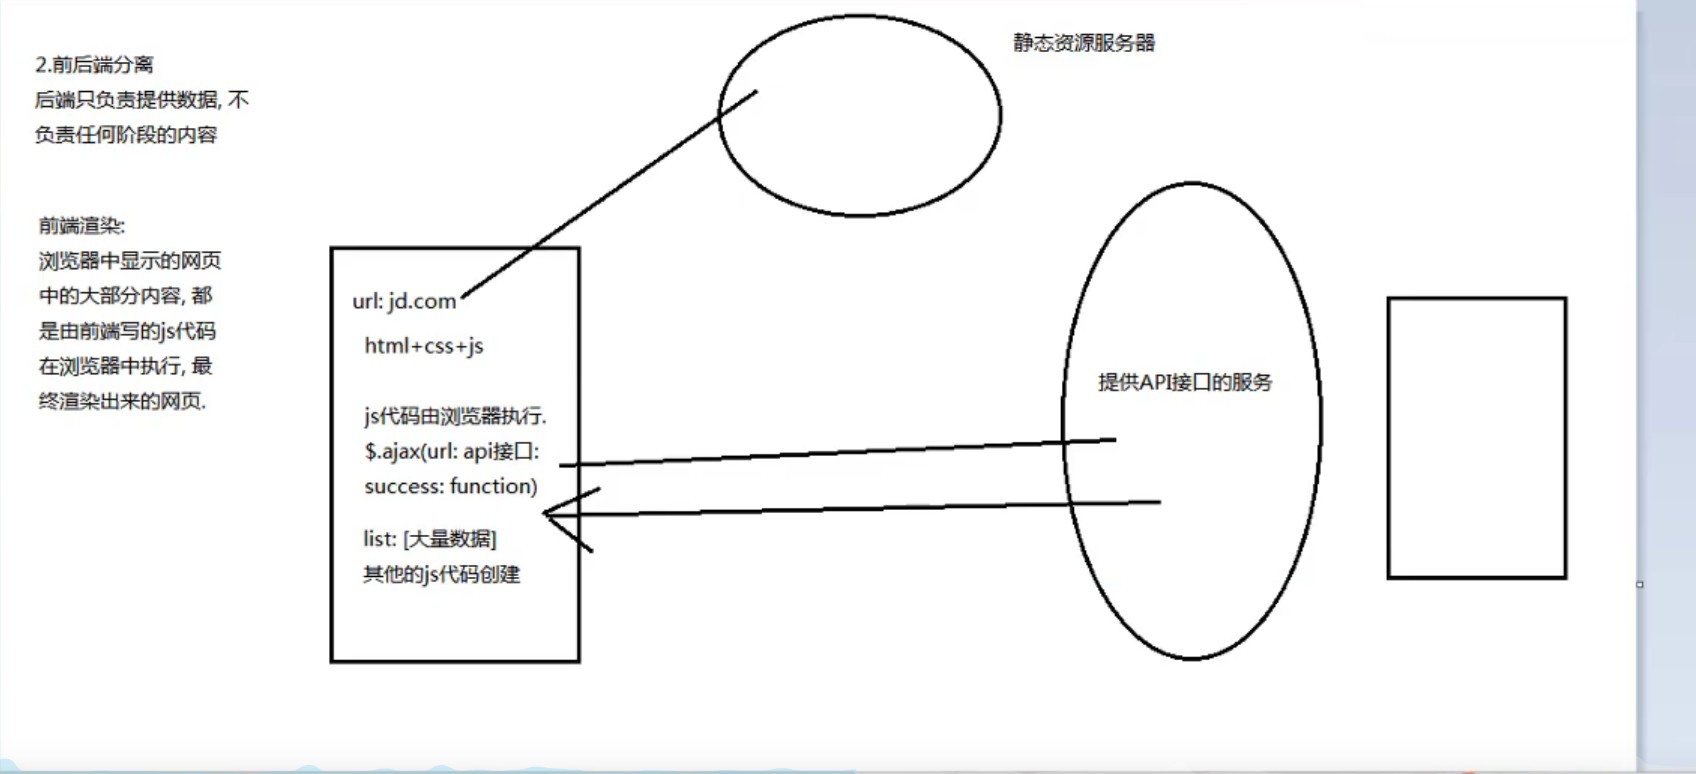
前端渲染阶段
■单页面富应用阶段:
口其实SPA最主要的特点就是在前后端分离的基础上加了一层前端路由
口也就是前端来维护一套路由规则.
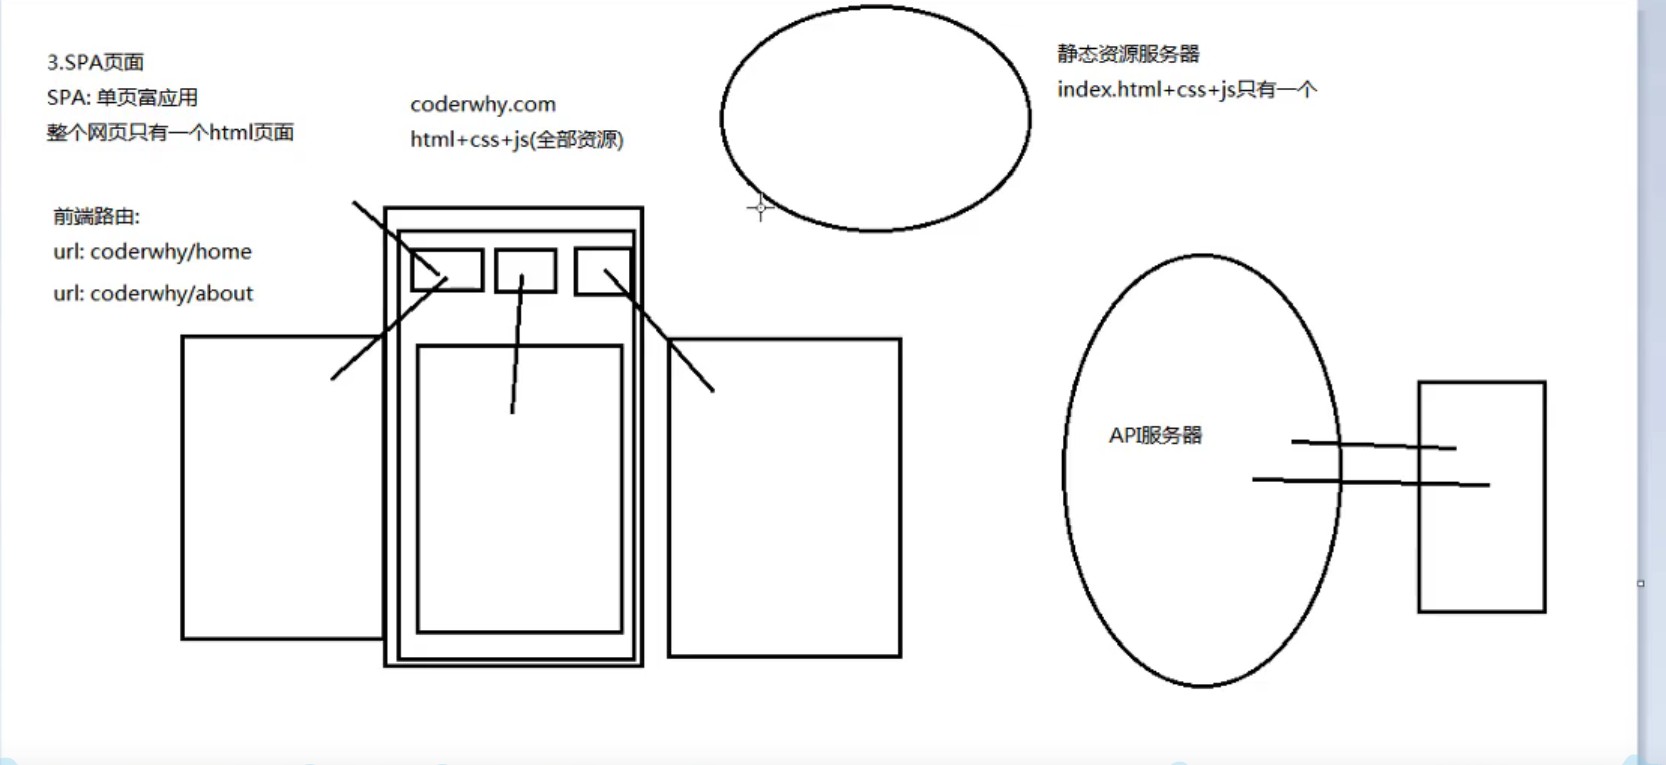
2.1.2.前端路由中url和组件的关系
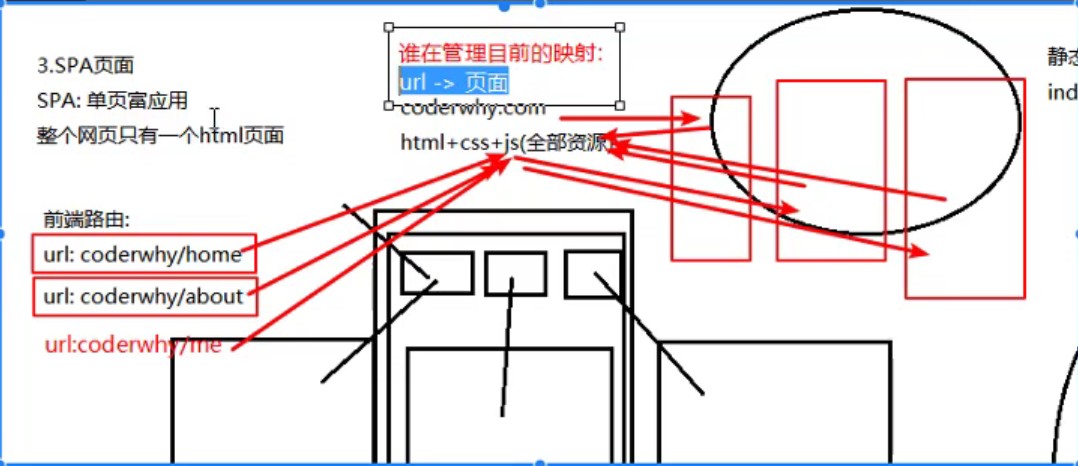
2.1.3. 前端路由的核心
改变URL,但是页画不进行整体的刷新
改变URL的hash
1 | location.hash = 'aaa' |
- HTML5的history模式
1 | history.pushState({}, '', 'home') |
href->hyper reference
数据结构:
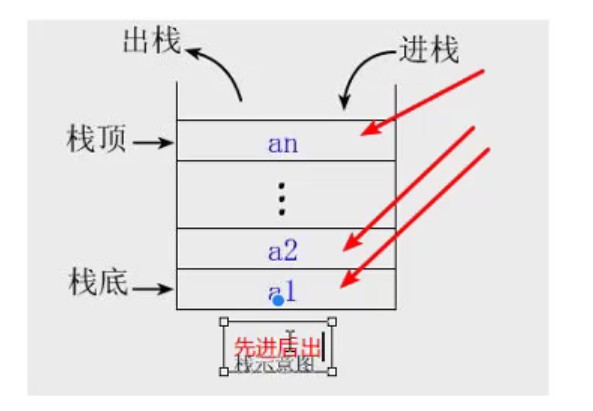
栈结构:先进后出
push入栈
- HTML5的history模式:replaceState
1 | history.replaceState({}, '', 'home') |
- history.go()
- 因为 history. back0等价于 history. go(-1)
history forward0则等价于 history. go(1)
这三个接口等同于浏览器界面的前进后退。
三大框架路由实现:
- Angular->ngRouter
- React->ReactRouter
- Vue->vue-router
2.2. vue-router基本使用
2.2.1. 安装步骤
- 安装
1 | npm install vue-router --save |
- 在模块化工程中使用,搭建路由框架
- 导入路由对象,并且调用Vue.use(VueRouter)
- 创建路由实例,并且传入路由映射配置
- 在Vue实例中挂载创建的路由实例
router=>index.js
1 | // 配置路由相关信息 |
main.js中挂载
1 | import router from './router' |
- 配置路由映射关系步骤:
- 创建路由组件
- 配置路由映射:组件和路径映射关系
- 使用路由:通过
和
router=>index.js
1 | import Home from '../components/Home' |
App.vue中
1 | <template> |
2.2.2. 配置默认路径
1 | export default new Router({ |
2.2.3. 添加history在index.js中可以消除地址栏中‘#’
1 | export default new Router({ |
2.2.4. router-link补充
- tag: tag可以指定渲染成什么组件,比如下面的代码会渲染成一个
1 | <router-link to="/home" tag="button">首页</router-link> |
- replace: 不会留下history记录,后退键不能返回到上一个界面中
1 | <router-link to="/home" tag="button" replace>首页</router-link> |
- active-class:修改默认的类名称
1 | export default new Router({ |
2.2.5. 路由代码跳转
App.vue
1 | <template> |
2.2.6. 动态路由的使用
- /user/:id
- params->parameters参数
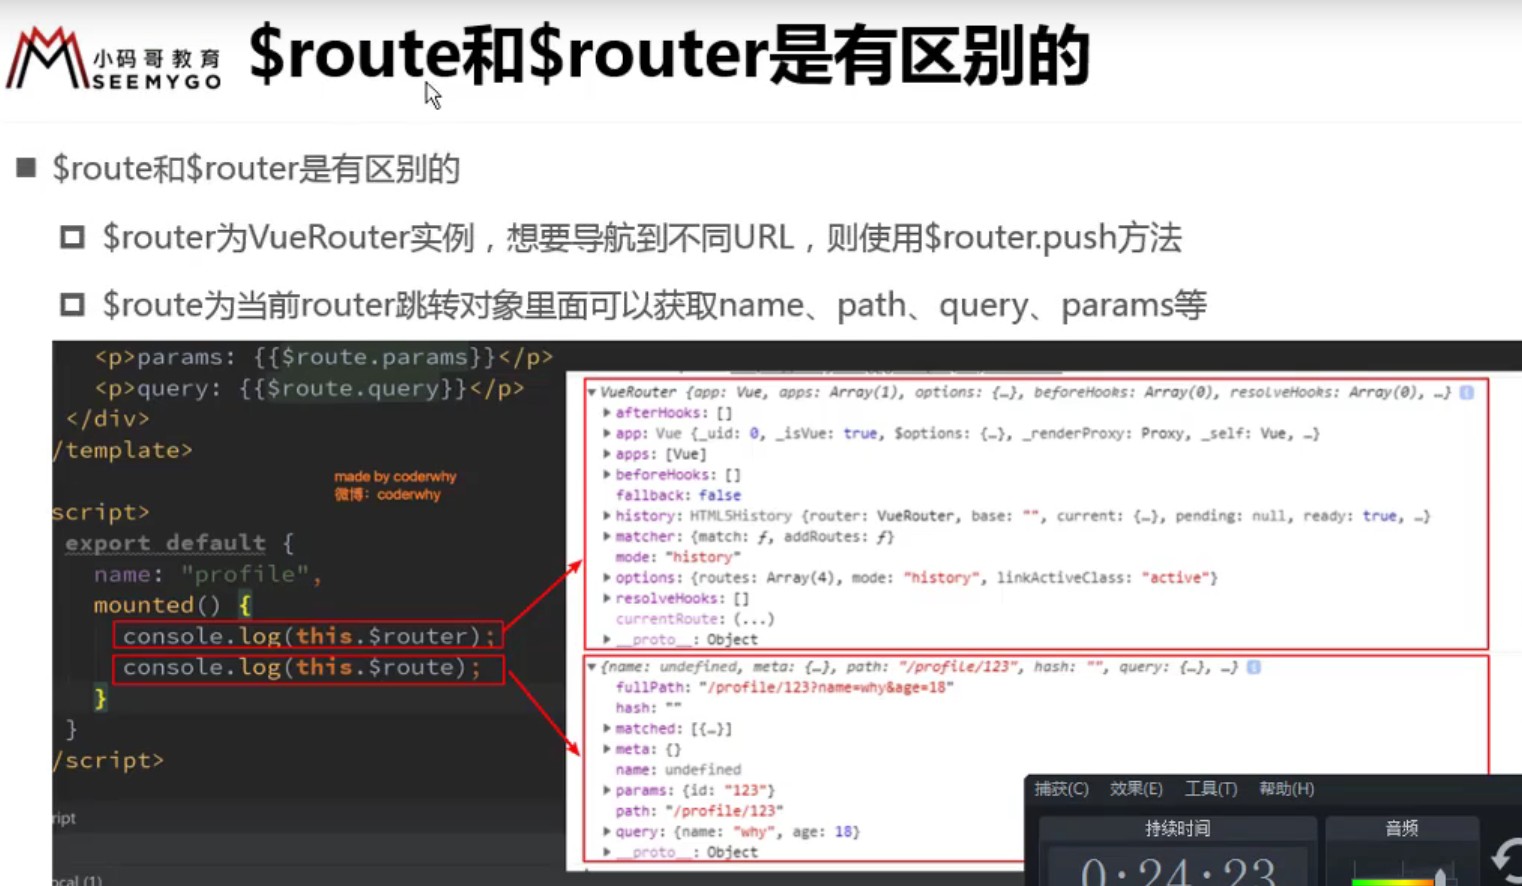
- this.$route.params.id
2.2.7. 认识路由的懒加载-打包文件的解析
用到时再加载
1 | 懒加载的方式 |
2.3. vue-router嵌套路由
- children:[]
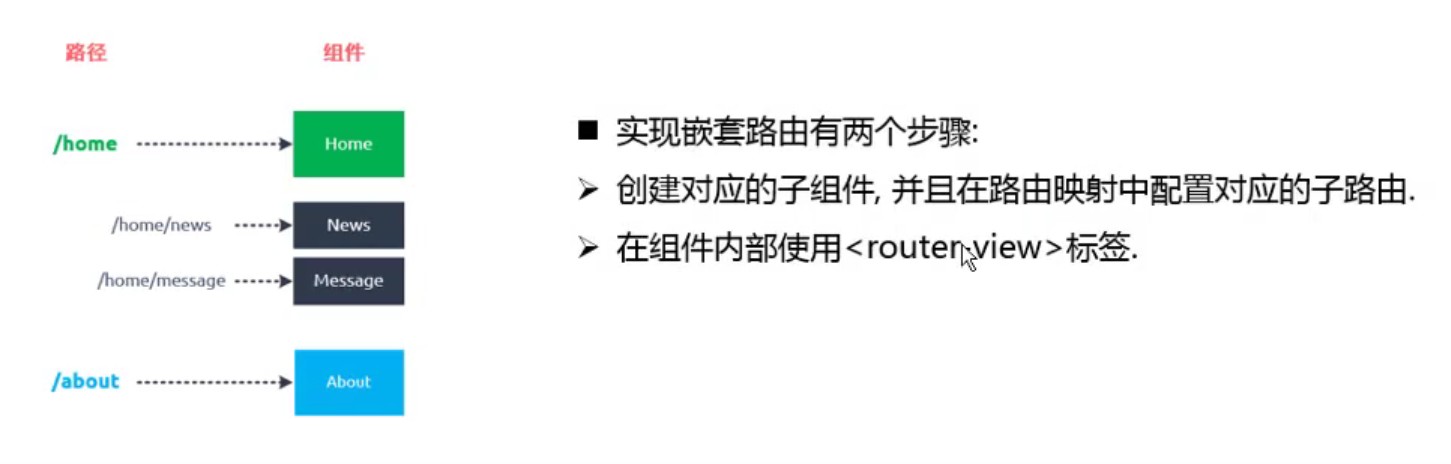
index.html
1 | routes: [ |
2.4. vue-router参数传递
profile -> 档案(用于‘我的’的用户界面)
准备工作:
- 创建新的组件Profile.vue
- 配置路由映射
- 添加跳转的
传递参数类型:
params的类型
- 配置动态路由:/router/:id
- 传递的方式:在path后面跟上对应的值
- 传递后形成的路径:/router/123,/router/abc
query
- 配置路由/router普通配置
- 传递的方式:对象中使用query的key作为传递方式
- 传递后形成的路径:/router?id=123, /router?id=abc
URL:
协议://主机:端口/路径?查询#片段哈希值
scheme://localhost:portt/path?query#fragment
所有的组件都继承着vue类的原型
2.5. vue-router导航守卫
- 全局导航守卫
- 路由独享守卫
- 组件类守卫
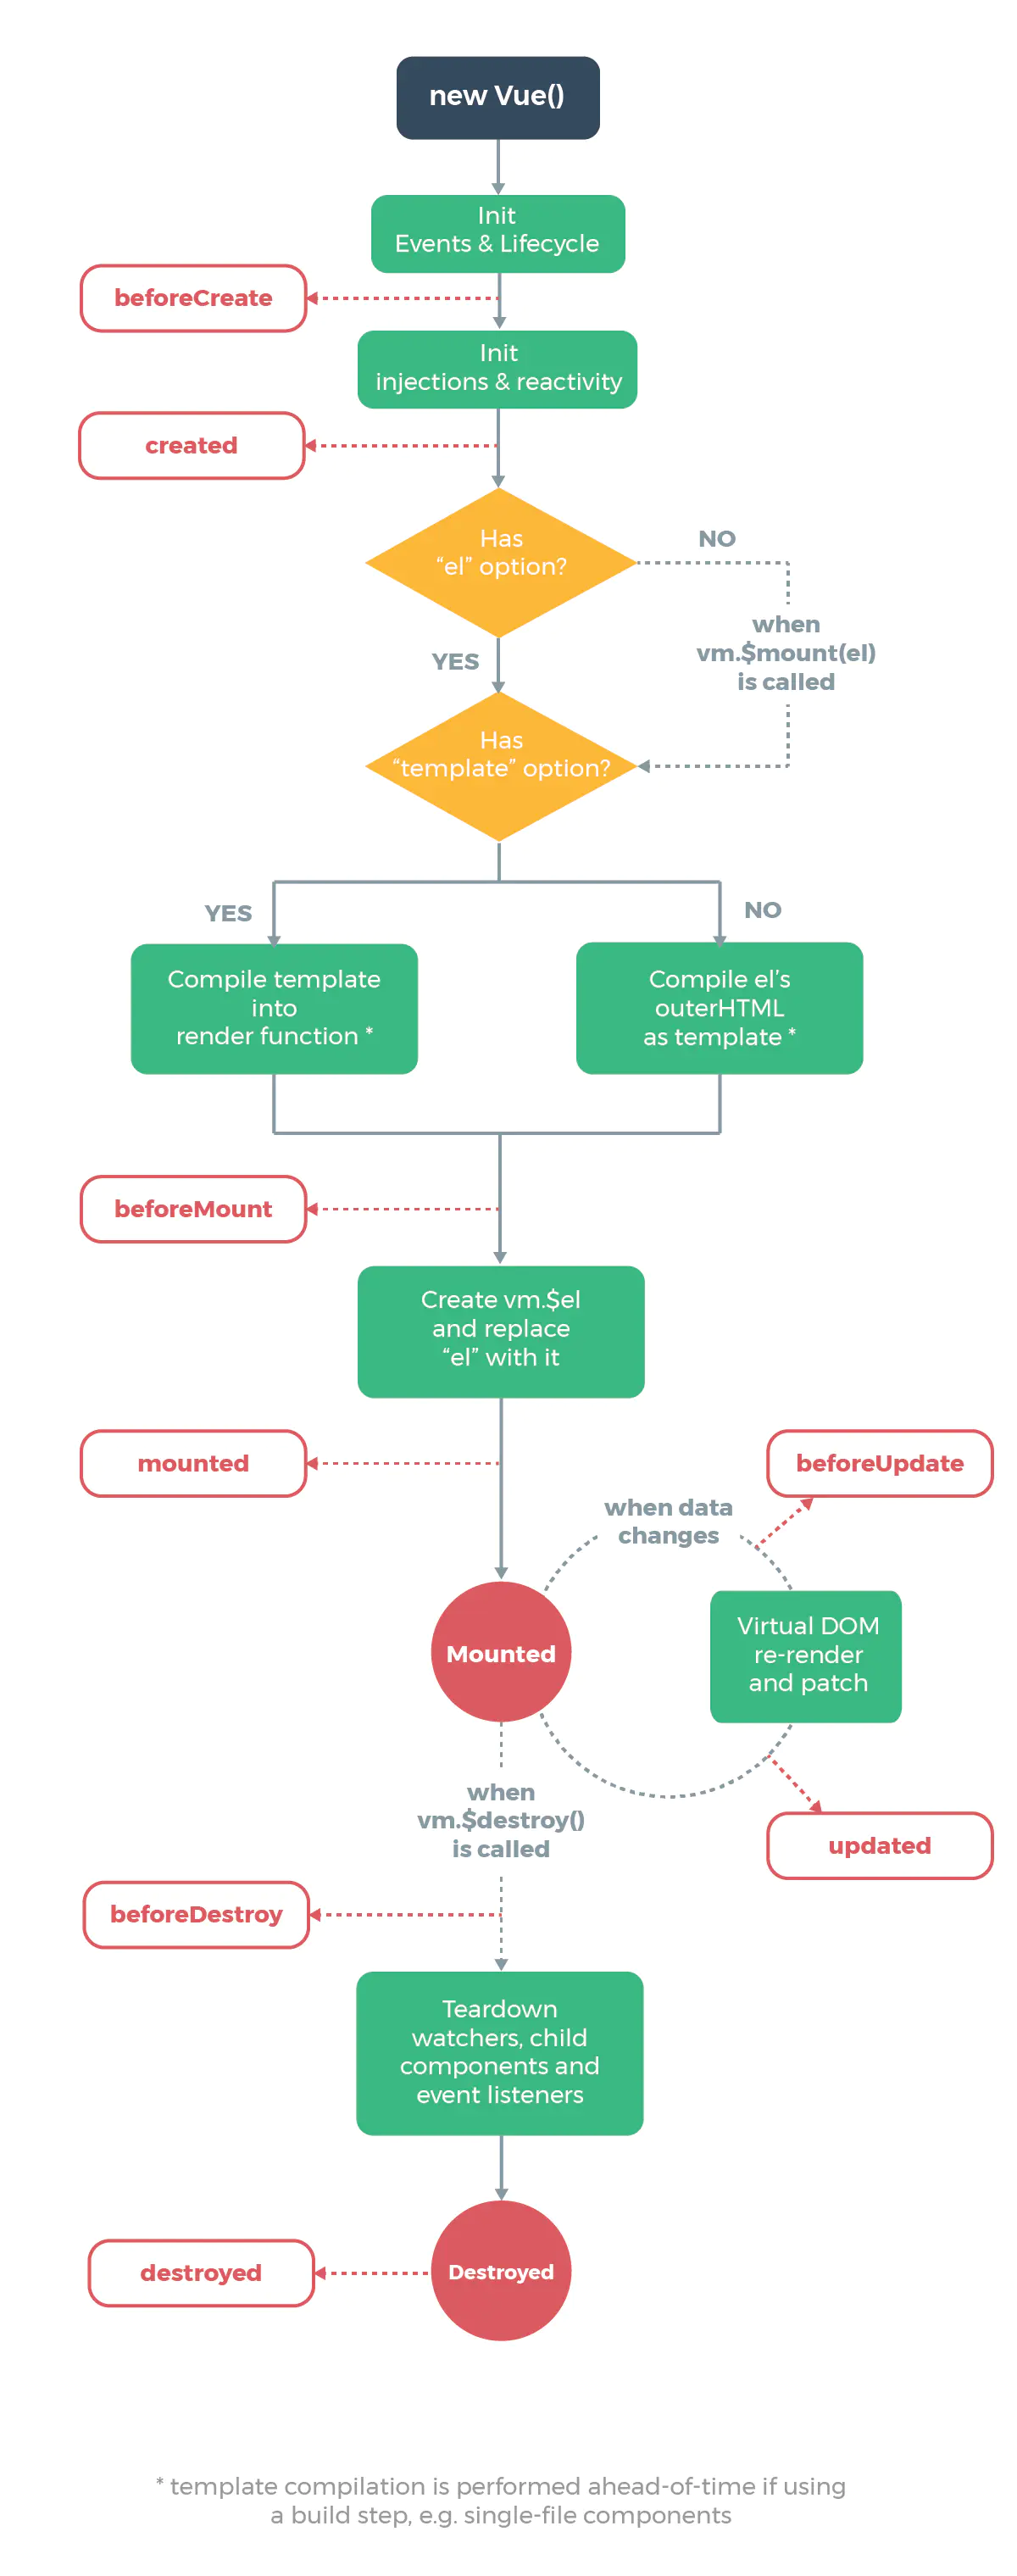
生命周期函数:
- init lifecycle
- beforeCreates如果有的话回调
- init 响应式等其他东西
- created(){}->创建组件时
- 挂载el、template
- beforemounted 创建vm替换el
- mounter(){} ->template挂载到组件时
- 做响应式检测回调beforeUpdate
- 重新渲染vdom,然后patch打补丁
- updated(){} ->界面刷新时
- beforeDestory后做一些回收的操作
- destroyed(){}->销毁
meta:元数据->描述数据的数据
metaclass元类可以创建类对象,接着创建实例对象
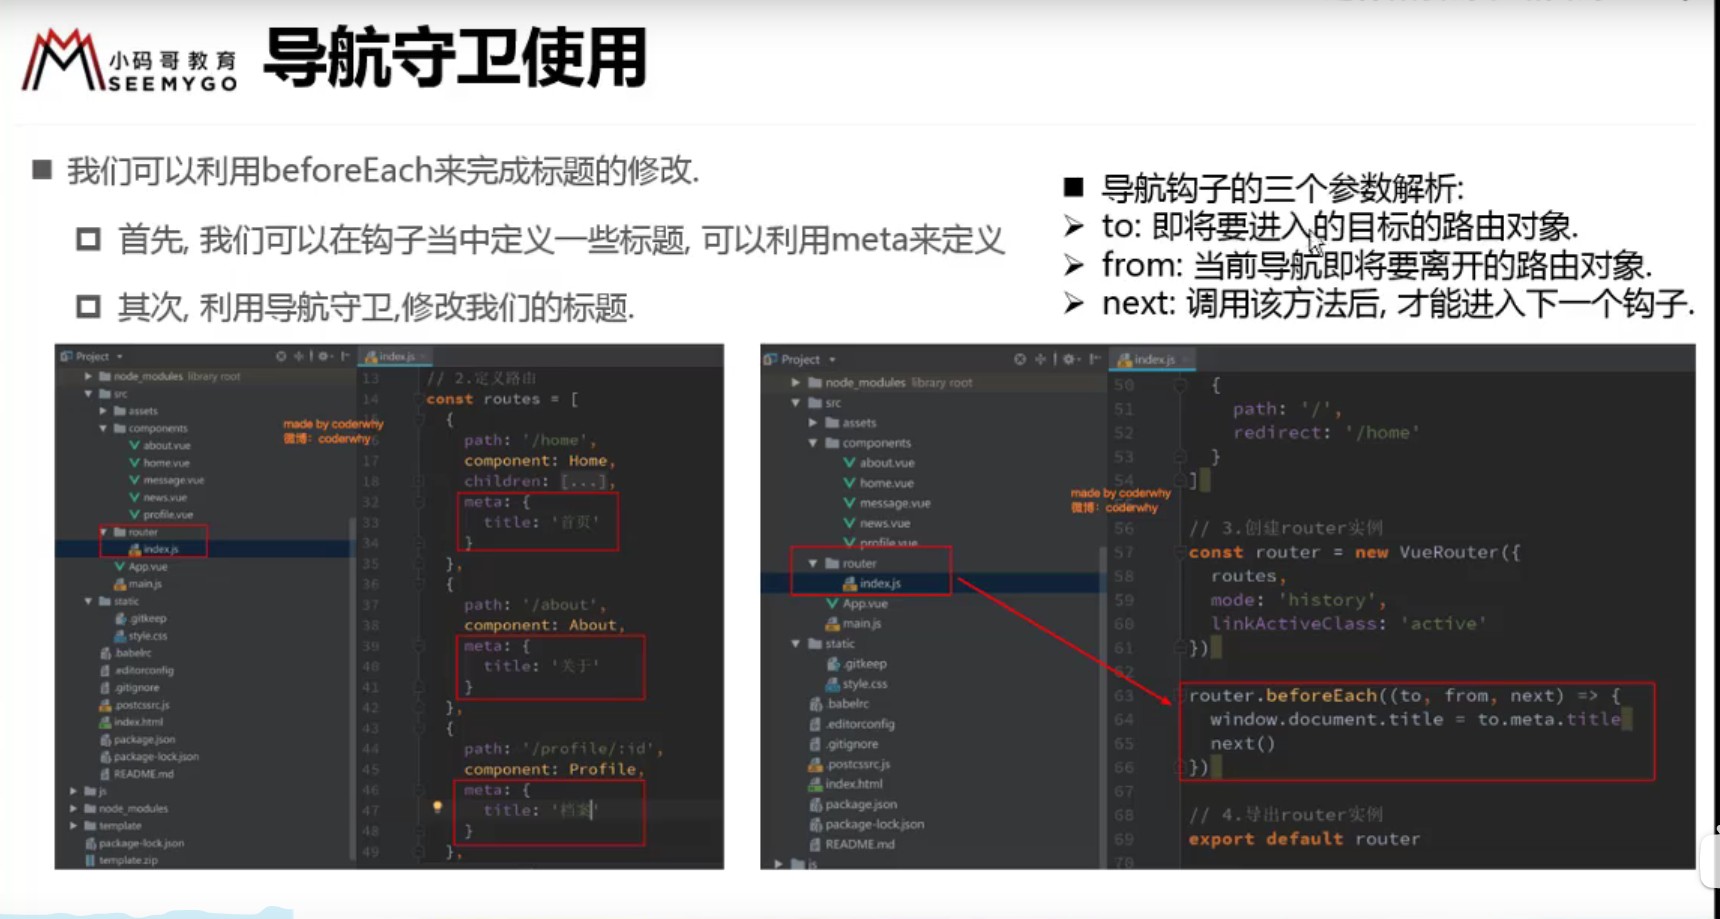
1 | // 配置路由相关信息 |
2.6. keep-alive
- keep-alie是Wue内置的一个组件,可以使被包含的组件保留状态,或避免重新渲染
- 它们有两个非常重要的属性:
- include-字符串或正则表达,只有匹配的组件会被缓存
- exclude-字符串或正则表达式,任问匹配的组件都不会被缓存
- 它们有两个非常重要的属性:
- router-view也是一个组件,如果直接被包在keep-aive里面,所有路径匹配到的视图组件都会被缓存
- 在keep-alive下才能使用activated/deactived这两个函数
- (不常用)首页中使用path属性记录离开时的路径,在beforeRouteLeave中记录
App.vue
1 | <keep-alive> |
Home.vue
1 | export default { |
2.9. TabBar的封装过程
如果在下方有一个单独的 TabBar组件,你如何封装
- 自定义 Tabbar组件,在APP中使用
- 让 TabBar出于底部,并且设置相关的样式
TabBar中显示的内容由外界决定
- 定义插槽
- fex布局平分 TabBar
- 自定义 TabBarlten,可以传入图片和文字
- 定义 TabBarltem,并且定义两个插槽:图片、文字。
- 给两个插槽外层包装div,用于设置样式
- 填充插槽,实现底部 TabBar的效果
- 传入高亮图片
- 定义另外一个插槽,插入 active-icon的数据
- 定义一个变量 inActive,通过 v-show来决定是否显示对应的icon
- TabBarlten绑定路由数据
- 安装路由 T npm install vue-router-save
- 完成 router/ ndex jsf的内容,以及创建对应的组件
- main s中注册 router
- APP中加入< router-view>组件
- 点击item跳转到对应路由,并且动态决定 inActive
- 监听tem的点击,通过this. Router. replace0替换路由路径
- 通过this. Route path. indexof( this link!==-1来判断是否是 active
- 动态计算 active样式
- 封装新的计算属性: this inActive? color:’red}: