一、Promise
1.1. 是什么?
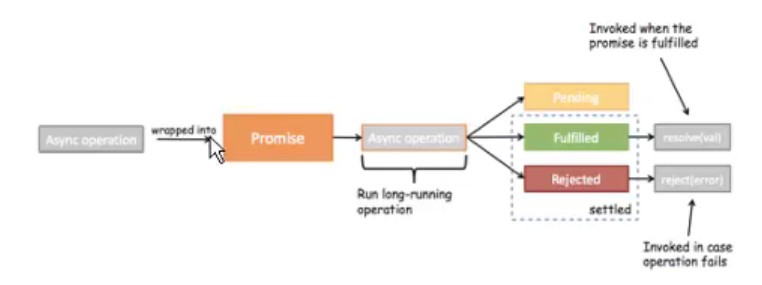
Promise是异步编程的一种解决方案。
1.2. 做什么?
用于网络请求非常复杂的情形下
口一种很常见的场景应该就是网络请求了
口我们封装一个网络请求的函数,因为不能立即拿到结果,所以不能像简单的3+4=7—样将结果返回
口所以往往我们会传入另外一个函数,在数据请求成功时,将数据通过传入的函数回调出去
口如果只是一个简单的网络请求,那么这种方案不会给我们带来很大的麻烦。
■但是,当网络请求非常复杂时,就会出现回调地狱
1 | // 什么情况下会用到Promise? |
1.3. promise的三种状态
- pending:等待状态,比如正在进行网络请求,或者定时
器没有到时间。 - fufl:满足状态,当我们主动回调了 resolve时,就处于
该状态,并且会回调then0 - reject:拒绝状态,当我们主动回调了 reject时,就处于该
状态,并且会回调 catch0
sync→>同步(synchronization)
asnc→>异步(asynchronization)
asnc operation异步操作
wropped into 包裹进去
另一种写法
1 | new Promise((resolve, reject) => { |
1.4. Promise链式调用:
1 | // 链式编程 |
1 | // wrapped into |
1.5. Promise的all方法使用
1 | Promise.all([ |
二、Vuex
2.1. Vuex是做什么的
- 官方解释:Vuex是一个专为 Vue. js应用程序开发的状态管理模式
- 它采用集中式存储管理应用的所有组件的状态,并以相应的规则保证状态以一种可预测的方式发生变化。
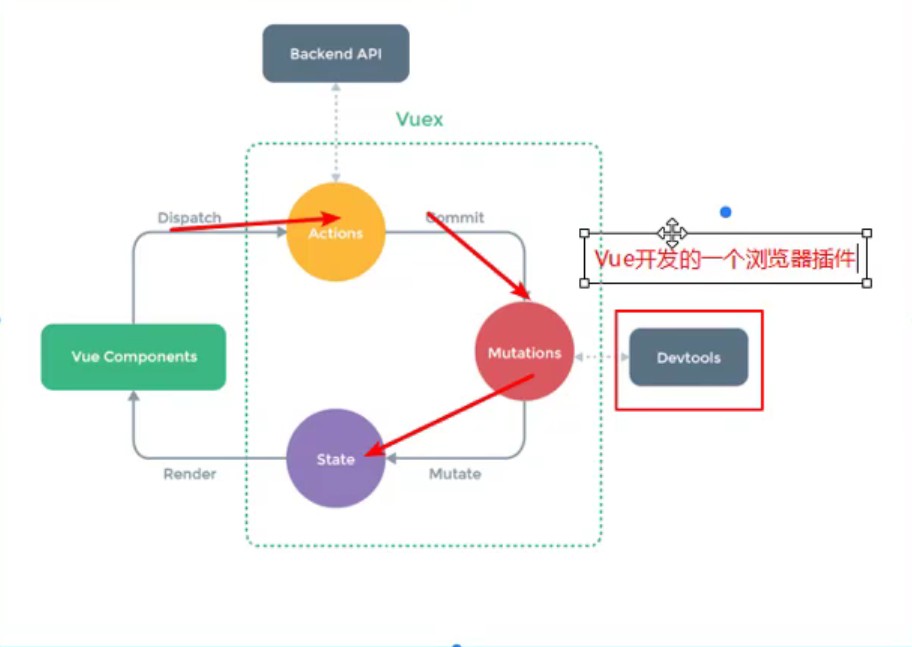
- Vuex也集成到Vue的官方调试工具 devtools extension,提供了诸如零配置的time- travel调试、状态快照导入导出等高级调试功能。
- 状态管理到底是什么?
- 状态管理模式、集中式存储管理这些名词听起来就非常高大上,让人捉摸不透。
- 其实,你可以简单的将其看成把需要多个组件共享的变量全部存储在一个对象里面。
- 然后,将这个对象放在顶层的Vue实例中,让其他组件可以使用。
- 那么,多个组件就可以共享这个对象中的所有变量属性
2.2. 管理什么状态
- 有什么状态时需要我们在多个组件间共享的呢?
- 如果你做过大型开放,你一定遇到过多个状态,在多个界面问的共享问题。
- 比如用户的登录状态、用户名称、头像、地理位置信息等等。
- 比如商品的收藏、购物车中的物品等等。
- 这些状态信息,我们都可以放在统一的地方,对它进行保存和管理,而且它们还是响应式的
- 如果你做过大型开放,你一定遇到过多个状态,在多个界面问的共享问题。
Talk is cheap, Show me the code. (来自LInus)
linus -> linux, git
2.3. 单界面到多界面状态管理切换
单页面管理状态
多界面状态管理
- 全局单例摸式(大管家)
- 我们现在要做的就是将共享的状态抽取出来,交给我们的大管家,统一进行管理
- 之后,你们每个试图,按照我规定好的规定,进行访问和修改等操作。
- 这就是vuex背后的基本思想
1 | npm intall vuex --save |
store-> index.js
1 | import Vue from 'vue' |
main.js
1 | import Vue from 'vue' |
App.vue
1 | <template> |
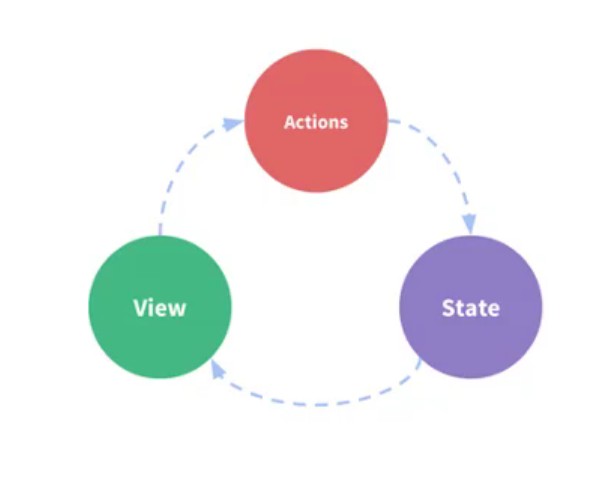
2.4. Vue状态管理图例
2.5. vuex核心概念
- State 保存共享状态 ->单一状态数
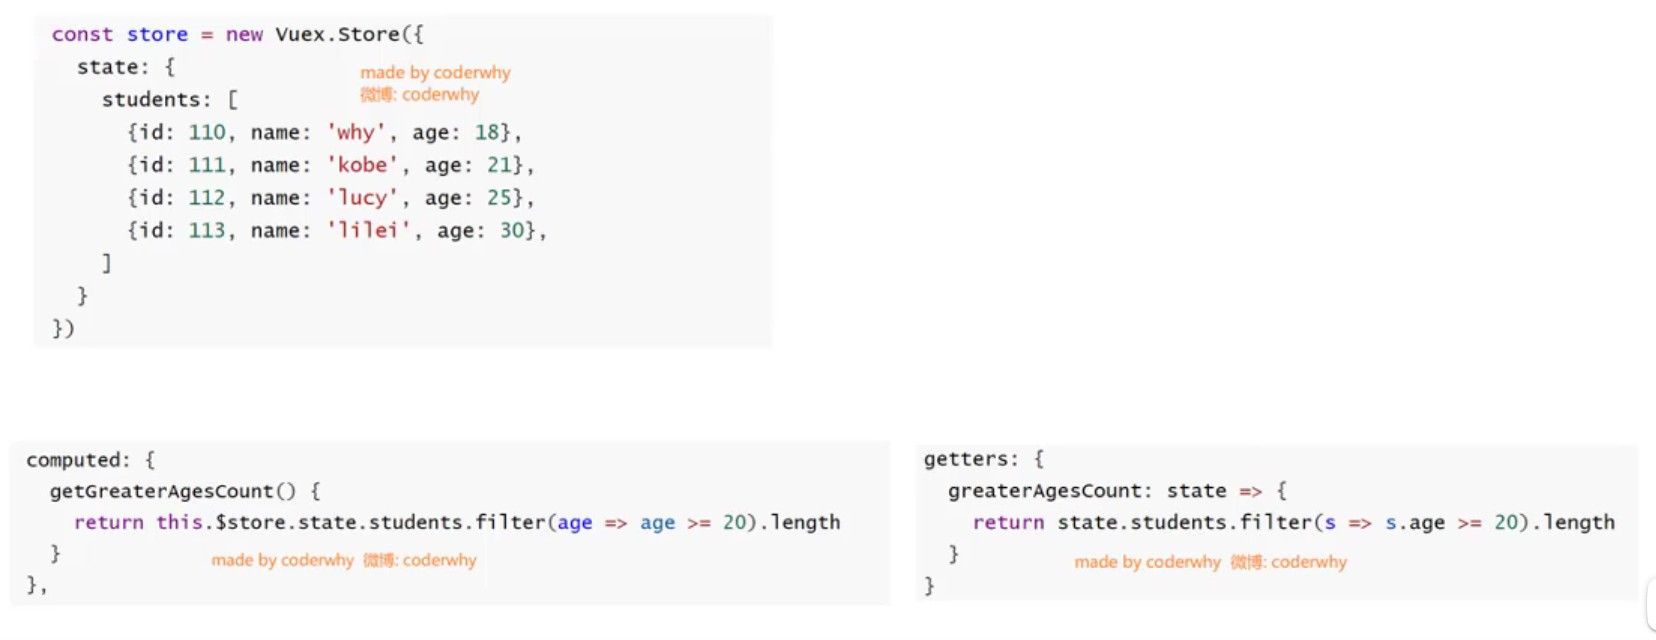
- Getters 类似于组件中计算属性
- Mutation 状态更新
- Action 异步操作
- Module 划分模块
2.5.1 State单一状态树
(Single Source of Truth,可以翻译成单一数据源)
如果你的状态信息是保存到多个 Store对象中的,那么之后的管理和维护等等都会变得特别困难。
所以∨uex也使用了单一状态树来管理应用层级的全部状态。
单一状态树能够让我们最直接的方式找到某个状态的片段,而且在之后的维护和调试过程中,也可以非常方便的管理和维护。
2.5.2. Getters基本使用
需要从 store中获取一些 state变异后的状态
2.5.3 Mutation状态更新
- Vuex的 store状态的更新唯一方式:提交 Mutation
- Mutation主要包括两部分:
- 字符串的事件类型(type)
- 一个回调函数( handler),该回调函数的第一个参数就是 state
- Mutation传递参数
参数被称为是 mutation的载荷( Payload)
■ Mutation中的代码:
1 | decrement(state, n) { |
很多参数需要传递,通常会以对象的形式传递也就是 payload是一个对象,可以再从对象中取出相关的信息
1 | changeCount(state, payload) { |
- Mutation提交风格
- 上面的通过 commit进行提交是种普通的方式
- Vue还提供了另外一种风格,它是一个包含type属性的对象
1 | addCount(count) { |
- Mutation响应规则
- Vuex的 store中的 state是响应式的,当 state中的数据发生改变时,Wue组件会自动更新
- 这就要求我们必须遵守一些vuex对应的规则:
- 提前在 store中初始化好所需的属性.
- 当给 state中的对象添加新属性时,使用下面的方式
方式一:使用 Vue. set(obj, newProp,123)
方式二:用新对象给旧对象重新赋值
Mutation常量类型一概念
- 我们来考虑下面的问题
- 在 mutation中我们定义了很多事件类型(也就是其中的方法名称)
- 当我们的项目增大时,Wuex管理的状态越来越多,需要更新状态的情况越来越多,那么意味着 Mutation中的方法越来越多
- 方法过多,使用者需要花费大量的经历去记住这些方法甚至是多个文件间来回切换查看方法名称甚至如果不
是复制的时候可能还会出现写铠的情况
- 我们来考虑下面的问题
Mutation同步函数
- 通常情况下,∨uex要求我们 Mutation中的方法必须是同步方法
- 主要的原因是当我们使用 devtools时,可以 devtools可以帮助我们捕捉 mutation的快照
- 但是如果是异步操作,那么 devtools将不能很好的追踪这个操作什么时候会被完成
2.6Action的基本定义
我们强调,不要再 Mutation中进行异步操作
口但是某些情况我们确实希望在vUex味进行些异步操作比如网络请求必
然是异步的这个时候怎么处理呢
口 Action类似于 Mutation,但是是用来代替 Mutation进行异步操作的
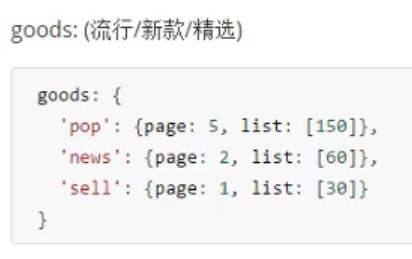
2.7. 认识Module
Module是模块的意思,为什么在vuex中我们要使用模块呢?
口Vue使用单一状态树那么也意味着很多状态都会交给
Vuex来管理
口当应用变得非常复杂时, store对象就有可能变得相当臃
肿
口为了解决这个问题Vuex允许我们将 store分割成模块
( Module),而每个模块拥有自己的 Istate、 mutations
actions、 getters等
■我们按照什么样的方式来组织模块呢?
口我们来看左边的代码
1 | const moduleA = { |
ES6语法:(对象的解构)
1 | Const obj={ |
Actions的写法
■ actions的写法呢?接收一个 context参数对象
口局部状态通过 context.state暴露出来,根节点状态则为 context.rootState.
1 | const moduleA = { |
■如果 getters中也需要使用全局的状态,可以接受更多的参数
1 | const moduleA = { |
三、网络请求封装
3.1. 选择什么网络模块
主要内容
■常见的网络请求模块,以及优缺点对比
JSONP的原理和封装
口 JSONP原理回顾
口 JSONP请求封装
■ axIos的内容详解
口认识 axIos网络模块
口发送基本请求
口 axIos创建实例
口 axIos拦截器的使用
选择什么网络模块?
vue中发送网络请求有非常多的方式那么在开发中如何选择呢?
选择一: 传统的Ajax是基于 XmlHttpreqUesT(xhr)
为什么不用它呢?
- 非常好解释,配置和调用方式等非常混乱
- 编码起来看起来就非常蛋疼
- 所以真实开发中很少直接使用,而是使用 Query-Ajax
■选择二:在前面的学习中,我们经常会使用 jQuery-Ajax
相对于传统的Aax非常好用
■为什么不选择它呢?
- 首先,我们先明确一点:在vue的整个开发中都是不需要
使用 jQuery了 - 那么,就意味着为了方便我们进行一个网络请求,特意引
用一个 jQuery你觉得合理吗? - jQuery的代码1w+行
- vue的代码才1W+行
- 完全没有必要为了用网络请求就引用这个重量级的框架
- 首先,我们先明确一点:在vue的整个开发中都是不需要
选择三:官方在vue1.x的时候推出了vue- resource
- vue- resource的体积相对于 jQuery小很多
- 另外vue- resource是官方推出的.
为什么不选择它呢?- 在vue20退出后,ue作者就在 GitHubl的 ISsues中说明
了去掉vue- resource,并且以后也不会再更新 - 那么意味着以后vue- reource不再支持新的版本时,也不
会再继续更新和维护 - 对以后的项目开发和维护都存在很大的隐患
- 在vue20退出后,ue作者就在 GitHubl的 ISsues中说明
■选择四:在说明不再继续更新和维护vue- resource的同时,作者
还推荐了一个框架: axIos
- axIos有非常多的优点并且用起来也非常方便
3.2jsonp
在前端开发中,我们种常见的网络请求方式就是丿SONP
口使用 JSONP最主要的原因往往是为了解决跨域访问的问题.
JSONPI的原理是什么呢?
口 JSONP的核心在于通过< script>标签的src来帮助我们请求数据.
口原因是我们的项目部署在 domain1com服务器上时,是不能直接访
问 domain2com服务器上的资料的
口这个时候我们利用< script>标签的src帮助我们去服务器请求到数
据将数据当做个 javascript的函数来执行并且执行的过程中传
入我们需要的json
口所以封装 ason的核心就在于我们监听 window上的 Jsonp进行回
调时的名称
3.3. 为什么选择axios
■功能特点
口在浏览器中发送 XmlhTtpreqUesTs请求
口在nodejs中发送http请求
口支持 Promise APi
口拦截请求和响应
口转换请求和响应数据
口等等
补充: axios名称的由来?个人理解
没有具体的翻译.
aXIOs: ajax l/onSystem
axios请求方式
■支持多种请求方式
- axIos( config)
- axios request(config)
- axiosget(url, config])
- axios delete(url config])
- axios head(url config)
- axios post(url[ dataL config])
- axios put(urIL dataL, config])
- axios patch(url[, dataL, config])
3.3. axios框架的基本使用
1 | npm install axios --save |
3.4. axios发送并发请求
- axios.all,可以放入多个请求的数组
- axios.all([])返回的结果是一个数组,使用axios.spread可将数组[res1,res2]展开为res1,res2
1 | // 2. axios发送并发请求 |
3.4. 全局配置
1 | axios.defaults.baseURL = 'http://123.207.32.32:8000' |
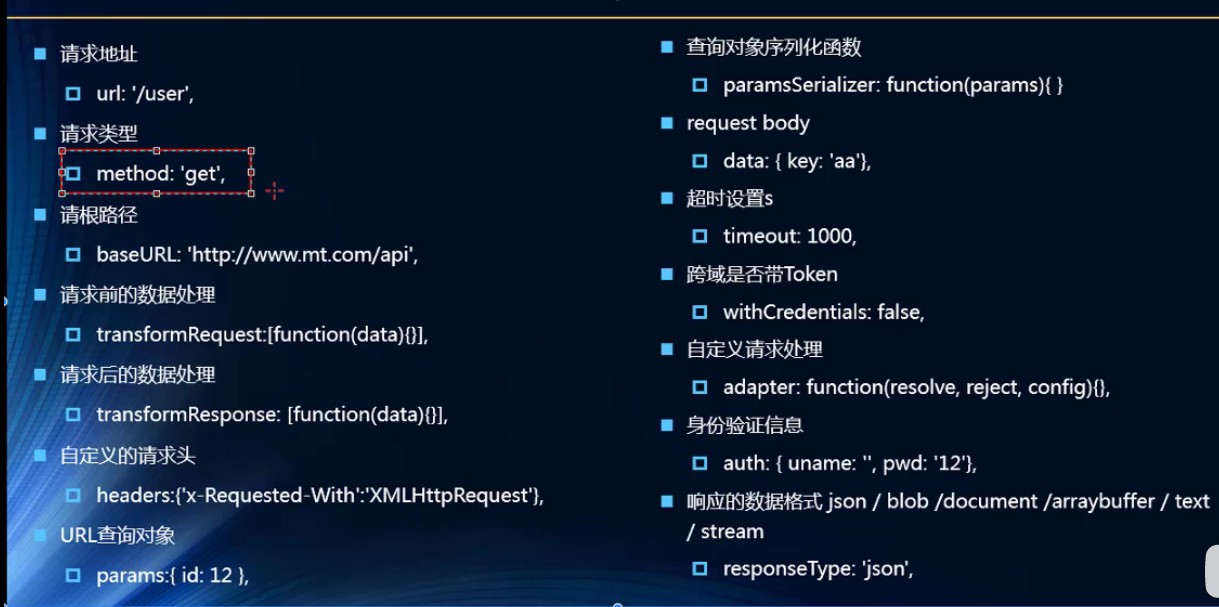
3.4. 常见配置选项
3.5. 创建对应的axios实例
1 | // 4. 创建对应的axios实例 |
3.6. 封装request模块
1 | // 5. 封装request模块 |
network -> request.js
1 | import axios from 'axios' |
3.7. axios的拦截器
- 请求拦截的作用
- 响应拦截
1 | export function request(config) { |
四、项目开发
1 | git branch -M main |
4.1. 划分目录结构
4.2. 引入CSS文件
:root 伪类 获取根元素html
4.3. vue.config.js 和 editorconfig
别名配置vue.config.js
1 | module.exports = { |
4.4. 项目的横向划分:tabbar -> 路由的映射关系
以前网页服务端渲染用jsp
4.5. 首页开发
- navbar的封装
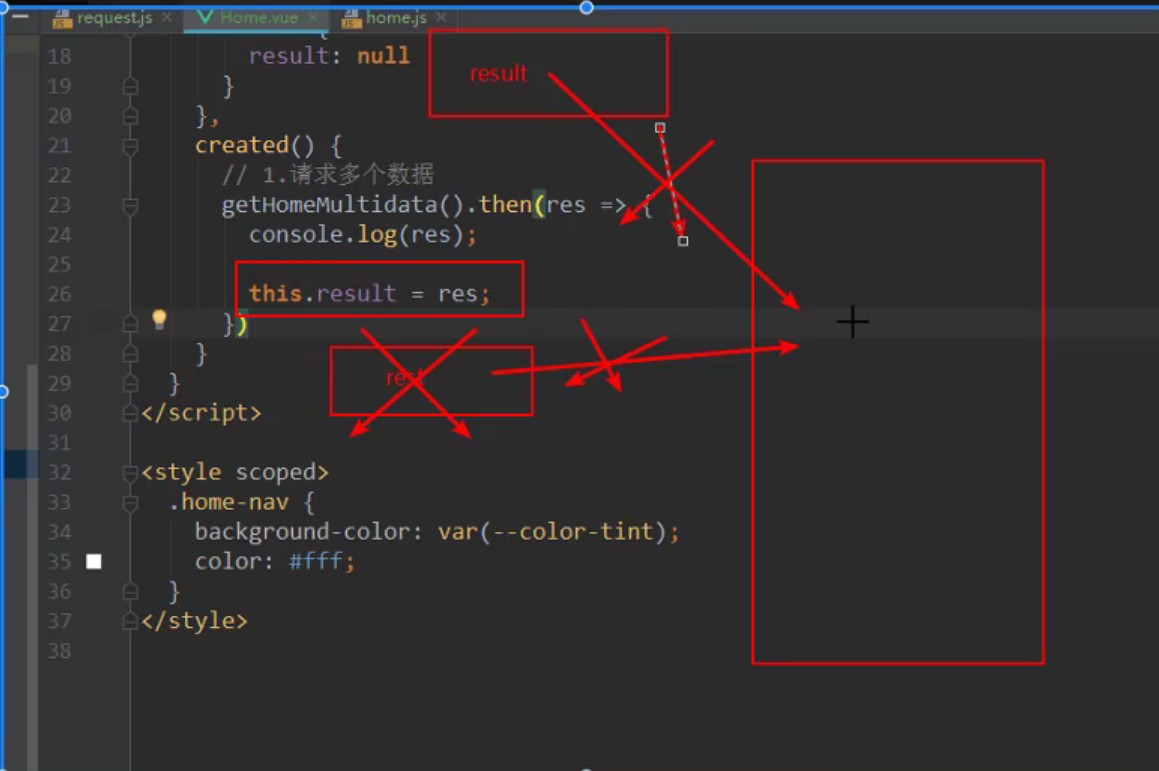
- 网络数据的请求
- 轮播图
- 推荐信息
1 | // 函数调用-> 压入函数栈(保存函数调用过程中的所有变量) |
垃圾回收
vueui库:mint-ui/iview